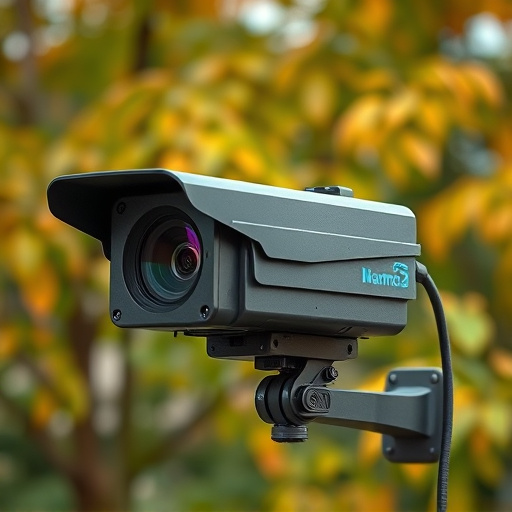
The Dummy Dome Camera Installation Guide offers an affordable and effective home security solution through realistic-looking cameras that deter intruders. By strategically placing these weatherproof cameras at 5-10 feet above ground level, with clear visibility of entry points, homeowners can boost outdoor security without professional services. The simple installation process involves mounting the camera, connecting wires, adjusting angles, and testing functionality. Regular maintenance includes inspecting housing, cleaning lenses, securing cords, and basic troubleshooting. This DIY approach saves costs, enhances authenticity, and allows customization to meet individual property needs.
“Enhance your outdoor security with weatherproof fake security monitoring systems, an innovative game-changer in home protection. This comprehensive guide delves into the world of dummy dome camera installation, highlighting its benefits and crucial considerations. Learn how these realistic replicas can deter intruders and boost your peace of mind. From choosing the perfect location to a step-by-step installation process and maintenance tips, we provide an in-depth Dummy Dome Camera Installation Guide for optimal results.”
- Understanding Weatherproof Outdoor Fake Security Monitoring Systems
- Benefits of Dummy Dome Camera Installation
- Choosing the Right Location for Your Fake Security Camera
- Step-by-Step Guide to Installing a Dummy Dome Camera
- Maintenance and Troubleshooting Tips for Outdoor Fake Security Cameras
Understanding Weatherproof Outdoor Fake Security Monitoring Systems
Weatherproof outdoor fake security monitoring systems, also known as dummy dome cameras, are designed to provide a robust and effective deterrent for potential intruders. These simulated surveillance devices are installed in areas where real security cameras might be impractical or unaffordable, such as remote locations, entry points, and perimeters. A Dummy Dome Camera Installation Guide can help property owners and managers understand the process, ensuring optimal placement for maximum impact.
Key features of weatherproof dummy dome cameras include a durable construction that withstand various weather conditions, from intense sunlight to heavy rain and snow. They mimic real security camera setups with LED indicators and realistic designs, effectively tricking intruders into believing they are under constant surveillance. Proper installation involves mounting them at strategic locations, ensuring clear sightlines and minimal obstructions for the best visual coverage.
Benefits of Dummy Dome Camera Installation
The Dummy Dome Camera Installation is a practical and cost-effective solution for enhancing home security. These realistic-looking cameras serve as a powerful deterrent to potential intruders, providing a sense of safety and peace of mind for homeowners. By strategically placing them around your property, you create an illusion of a well-monitored environment, making it less attractive for burglars.
This installation guide offers a simple and efficient way to boost security without the need for extensive wiring or professional services. With just a few tools and materials, you can securely mount these cameras in ideal locations, ensuring optimal visibility. This DIY approach not only saves costs but also allows for customization, catering to individual property needs.
Choosing the Right Location for Your Fake Security Camera
When setting up a weatherproof outdoor fake security monitoring system, selecting the optimal location for your Dummy Dome Camera is paramount. Start by assessing the area you wish to secure, considering factors like visibility and line-of-sight obstructions. Ensure the camera has a clear view of potential entry points, such as gates, doors, or windows, to maximize its deterrent effect.
Refer to our Dummy Dome Camera Installation Guide for detailed instructions on choosing the best mounting position. Ideally, place your fake security camera at a height that allows for unobstructed viewing, typically between 5 and 10 feet above ground level. Proper positioning will not only enhance the camera’s effectiveness but also make it more challenging for potential intruders to identify or disable your security system.
Step-by-Step Guide to Installing a Dummy Dome Camera
Installing a dummy dome camera is a straightforward process that can significantly enhance your outdoor security. Here’s a step-by-step guide to help you get started:
1. Select the Ideal Location: Choose a spot that offers an unobstructed view of the area you want to monitor, such as your front yard, backyard, or entrance gate. Ensure it’s easily visible to deter potential intruders.
2. Prepare the Surface: Clean and prepare the mounting surface, ensuring it’s free from debris and has adequate traction for secure attachment. Use a level to ensure the camera is aligned correctly before proceeding.
3. Attach the Camera Mount: Securely fix the dummy dome camera’s mount to the chosen location using screws or adhesive provided with the product. Make sure it’s firmly in place, capable of withstanding varying weather conditions.
4. Connect Wires (if applicable): Some models may require you to connect wires from the camera to a power source and/or a monitor for real-time viewing. Follow the instructions carefully to ensure proper connections.
5. Adjust Camera Angle: Twist the camera’s body or use adjustable mounts to position it at the desired angle, offering the best field of view.
6. Test and Ensure Functionality: Power on the camera and check its functionality, including motion detection (if equipped) and image clarity. Make any necessary adjustments to ensure optimal performance.
Maintenance and Troubleshooting Tips for Outdoor Fake Security Cameras
Regular maintenance is key to ensuring your outdoor fake security cameras function optimally and look authentic. Start by regularly inspecting the camera’s housing for any signs of damage or wear, especially if it’s exposed to varying weather conditions. Cleaning the lens with a soft cloth or brush can help maintain clarity. Keep an eye out for loose connections at the power cords or data cables; secure them properly to prevent disruptions.
When troubleshooting, begin with basic checks like ensuring the camera is plugged in and powered on. Verify the connection to the monitoring system if applicable. If the camera isn’t recording or transmitting clearly, try resetting it by unplugging for a few minutes and then plugging it back in. For more complex issues, consult the manufacturer’s guide or consider professional assistance for a thorough Dummy Dome Camera Installation Guide.
Weatherproof outdoor fake security monitoring systems, such as dummy dome cameras, offer a cost-effective and realistic deterrent for potential intruders. By following our comprehensive guide on understanding these systems, choosing the right location, and installing your own dummy dome camera, you can enhance your home or business’s security without breaking the bank. Regular maintenance and troubleshooting will ensure these devices remain effective, providing peace of mind and a safer environment. For those seeking a simple yet powerful security solution, this Dummy Dome Camera Installation Guide is a valuable resource to protect what matters most.